Step 1: Set up the informatica server, Database source and Target connections in DAC.
For setting up the informatica server and Database connection information login to DAC and Navigate to setup tab and enter the details as shown in screenshots below.


Test the connection after entering all the details by clicking on test connection button.
Step 2: Configuring informatica folders in DAC
There are 2 types of folders in DAC.
Physical folders which has the same name as the folders present in informatica.
Logical folders which are created in DAC.
The physical folders are mapped to logical folders.
For creating the logical folders Navigate to --> Tools--> seed data --> Task --> logical Folders


For creating the physical folders Navigate to --> Design--> Source System Folders.
Map the physical folders to logical folders as shown in screenshot below.

Step 3: Importing Database table into DAC.
Navigate to Design --> Tables -->
Right click and Import database tables and columns into DAC.


Step 4: Importing Database table indexes into DAC.
Navigate to Design --> indices -->
Right click and Import database table indexes into DAC.


Step 5: Creating DAC TASK
DAC task is similar to informatica workflow. we need to provide the informatica full load workflow and incremental workflow information in TASK.
Navigate to Design tab—> Tasks tab -->New
Enter the required information as shown in below screenshot.

In command for incremental Load and Command for Full Load enter the incremental and full load workflow names and enter the remaining details such as source and target schema connections and save the Task.
Add the target table to the task Navigate to Target tables sub tab and click on add/remove button.

Here you can select if you want to truncate the table while full and incremental loads.
Step 6: Creating a Subject area.
Subject area is a collection of related tasks. we can create multiple subject areas in DAC.
A task can be added to multiple subject areas, we need to make sure that the tasks in different subject areas are not overlapping during run.
Navigate --> Design --> Subject Areas --> New
Enter the subject area details and save.

Assign the required tasks to the subject area.
Navigate to tasks sub tab and Click on Add/Remove and add all the tasks to subject area and save.

After adding all the tasks click on Assemble tab, click ok.
Step 7: Creating Execution Plan.
An execution plan includes the ordered tasks to be executed together in order to populated one ore more subject area.
Navigate to
Execute tab --> Execution plans --> New
Create the execution plan and select the options required.

Navigate to Subject areas sub tab and add the subject area to the execution plan.
We can add multiple subject areas to execution plan.

Navigate to Connectivity Parameters and click Generate and assign the connection information and Folder information and save.
Step 8: Running the Execution Plan.
Navigate to Execute tab --> Execution Plan
Click on Execution Plan and Run Now.
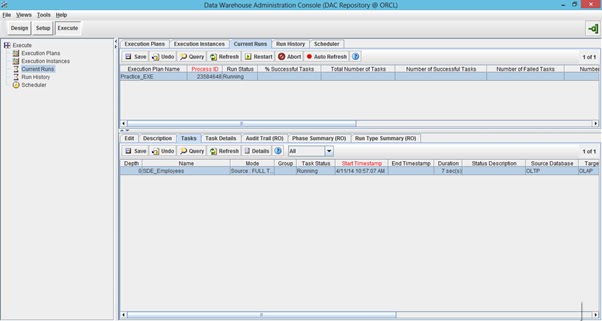
we can check the execution plan status in Current runs tab.


Step 9: Scheduling
We can schedule the loads in DAC Scheduler tab.
Note: if we are adding any new task to subject area then we need to Assemble the subject area and build the execution plan for changes to take effect.